theMGZS.co.uk   Navigation

AboutNews Flyers Forum Events Home

Home
Go Back   theMGZS.co.uk :: MG ZS forum > Technical Area > Build Projects

Reply
 
Thread Tools Display Modes
Old 21-04-17, 04:02 PM   #111
Big-Jay
Member
 
Big-Jay's Avatar
 
Join Date: Jan 2016
Posts: 121
Big-Jay has a spectacular aura aboutBig-Jay has a spectacular aura about
Quote:
Originally Posted by Dan1971 View Post


Quote:
Originally Posted by ZS Phil View Post
As always, looking great.
That de-bobbler looks fancy compared to mine (bag of 10 bic razors!)
Cheers bud,

Yeh it's a great bit of kit, used it on around four sets of seats now and it still works perfectly. Caught a glimpse of your 45 at POL, looked damn good !

Edit: Ignore that last part, got you confused with someone else !

Last edited by Big-Jay; 23-04-17 at 02:57 PM.
Big-Jay is offline   Reply With Quote
Old 23-04-17, 02:58 PM   #112
Big-Jay
Member
 
Big-Jay's Avatar
 
Join Date: Jan 2016
Posts: 121
Big-Jay has a spectacular aura aboutBig-Jay has a spectacular aura about
Finished up laying down the base coat and lacquer today, here's a few pictures.

Laid down a light coat of primer on the wheel well and rear panel -


Base coat -


Lacquer -


Will be putting an order into Rimmerbro's over the next week or so for all the bits needed to rebuild the rear end.

Jay.

Last edited by Big-Jay; 24-04-17 at 11:10 AM.
Big-Jay is offline   Reply With Quote
Old 23-04-17, 04:59 PM   #113
stamford
Site Owner
 
stamford's Avatar
 
Join Date: Jul 2007
Location: Waterlooville, Hants
Posts: 24,095
stamford has much to be proud ofstamford has much to be proud ofstamford has much to be proud ofstamford has much to be proud ofstamford has much to be proud ofstamford has much to be proud ofstamford has much to be proud ofstamford has much to be proud ofstamford has much to be proud ofstamford has much to be proud ofstamford has much to be proud of
Speechless, that looks incredible.
__________________
------------------------------
theMGZS.co.uk Admin
------------------------------
__________________
Some useful links:
stamford is offline   Reply With Quote
Old 24-04-17, 09:36 AM   #114
Big-Jay
Member
 
Big-Jay's Avatar
 
Join Date: Jan 2016
Posts: 121
Big-Jay has a spectacular aura aboutBig-Jay has a spectacular aura about
Quote:
Originally Posted by stamford View Post
Speechless, that looks incredible.
Thanks Mick !
Big-Jay is offline   Reply With Quote
Old 24-04-17, 11:01 AM   #115
peterzs
promoted bloke!
 
peterzs's Avatar
 
Join Date: May 2008
Location: bournemouth
Posts: 16,796
peterzs is a splendid one to beholdpeterzs is a splendid one to beholdpeterzs is a splendid one to beholdpeterzs is a splendid one to beholdpeterzs is a splendid one to beholdpeterzs is a splendid one to beholdpeterzs is a splendid one to beholdpeterzs is a splendid one to beholdpeterzs is a splendid one to behold
Smile

Good work. like new.

__________________
------------------------------
theMGZS.co.uk Admin
------------------------------
__________________
peterzs is offline   Reply With Quote
Old 24-04-17, 11:11 AM   #116
Big-Jay
Member
 
Big-Jay's Avatar
 
Join Date: Jan 2016
Posts: 121
Big-Jay has a spectacular aura aboutBig-Jay has a spectacular aura about
Quote:
Originally Posted by peterzs View Post
Good work. like new.

Cheers bud !
Big-Jay is offline   Reply With Quote
Old 14-05-17, 04:23 PM   #117
Big-Jay
Member
 
Big-Jay's Avatar
 
Join Date: Jan 2016
Posts: 121
Big-Jay has a spectacular aura aboutBig-Jay has a spectacular aura about
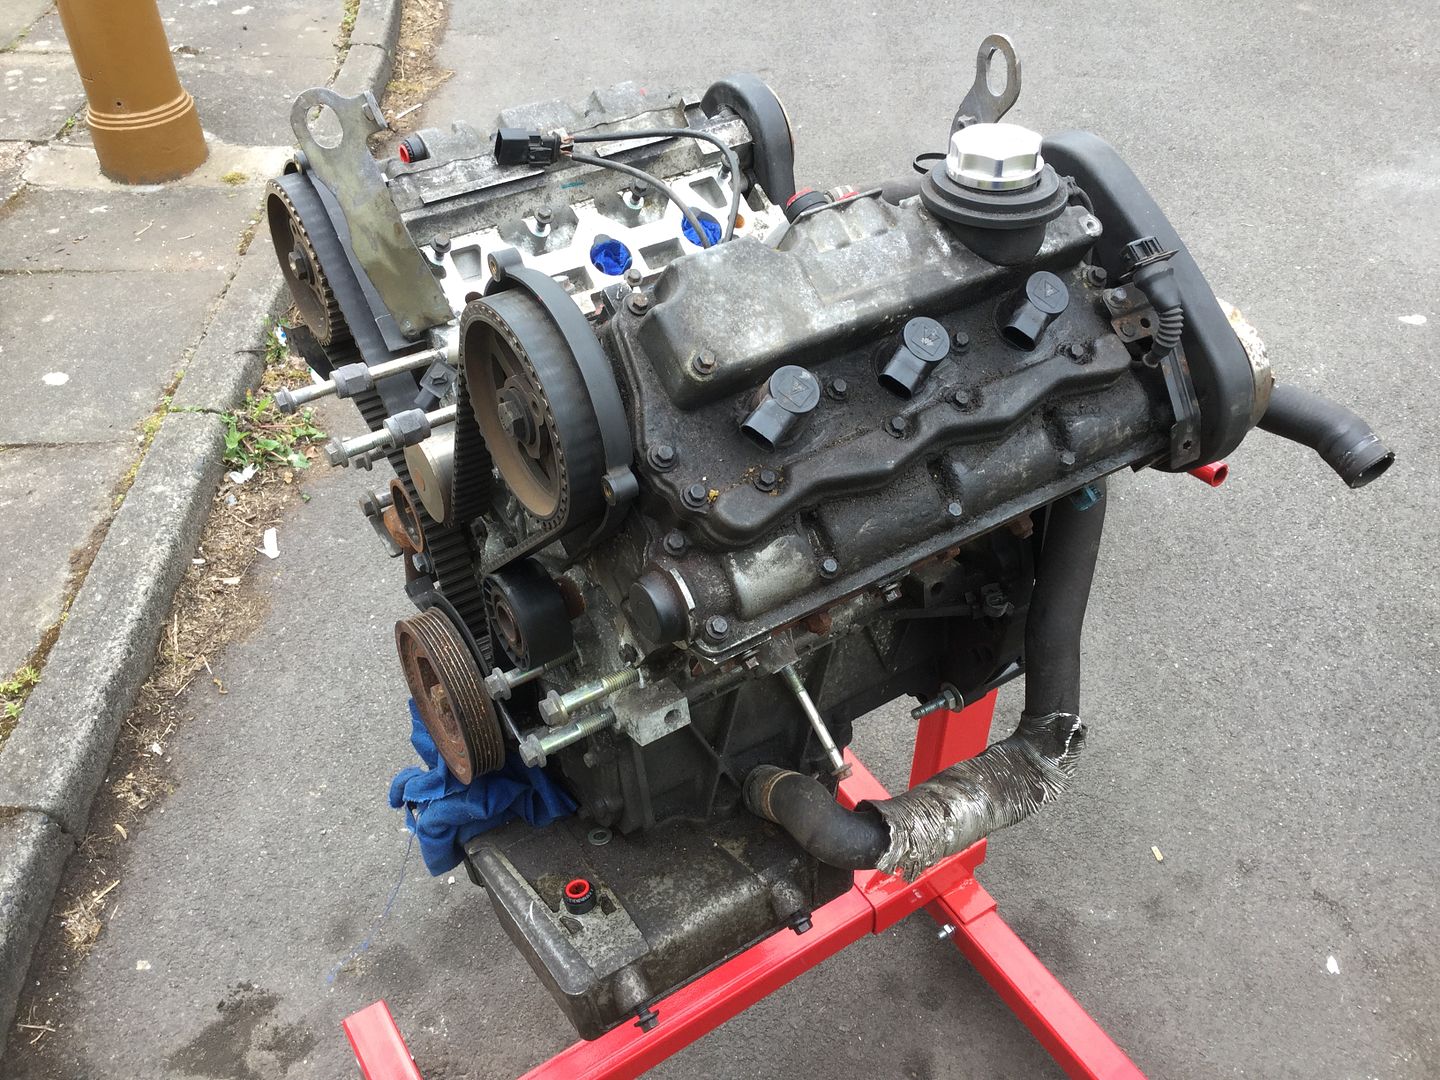
Got quite a bit done over the last couple of weeks. I'll start with the engine.

Here it is on the stand in all it's oily glory, I've stripped off most bits for cleaning -


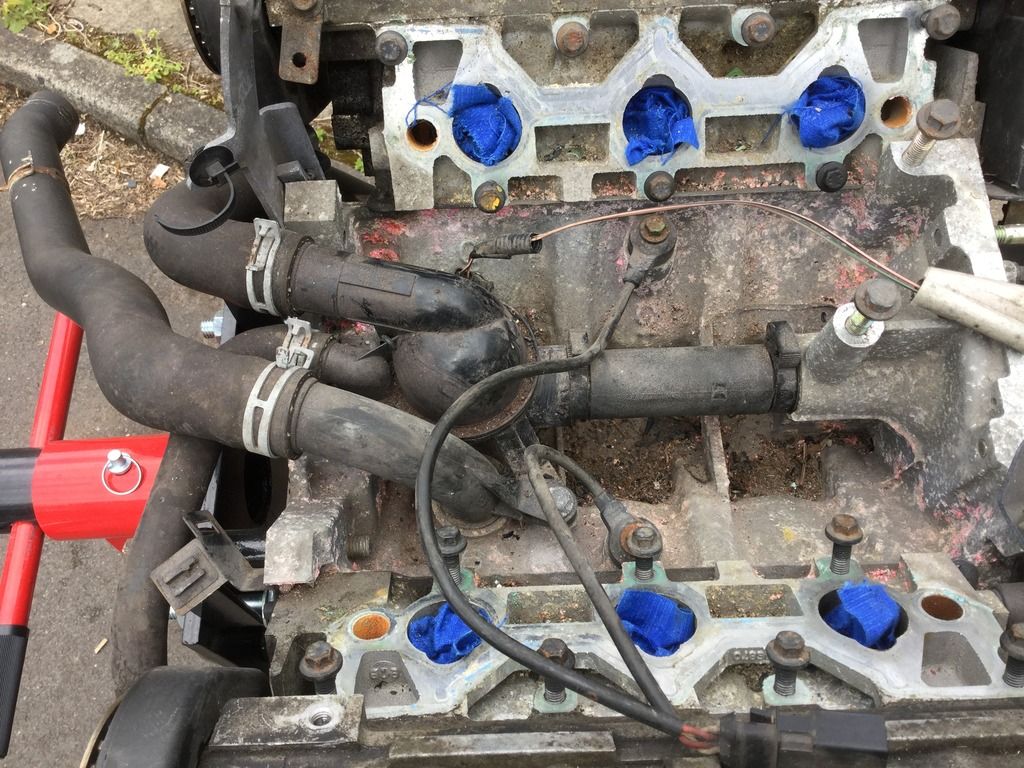
You can see the 'V' is full of muck and there's also evidence of a possible leaky thermostat -


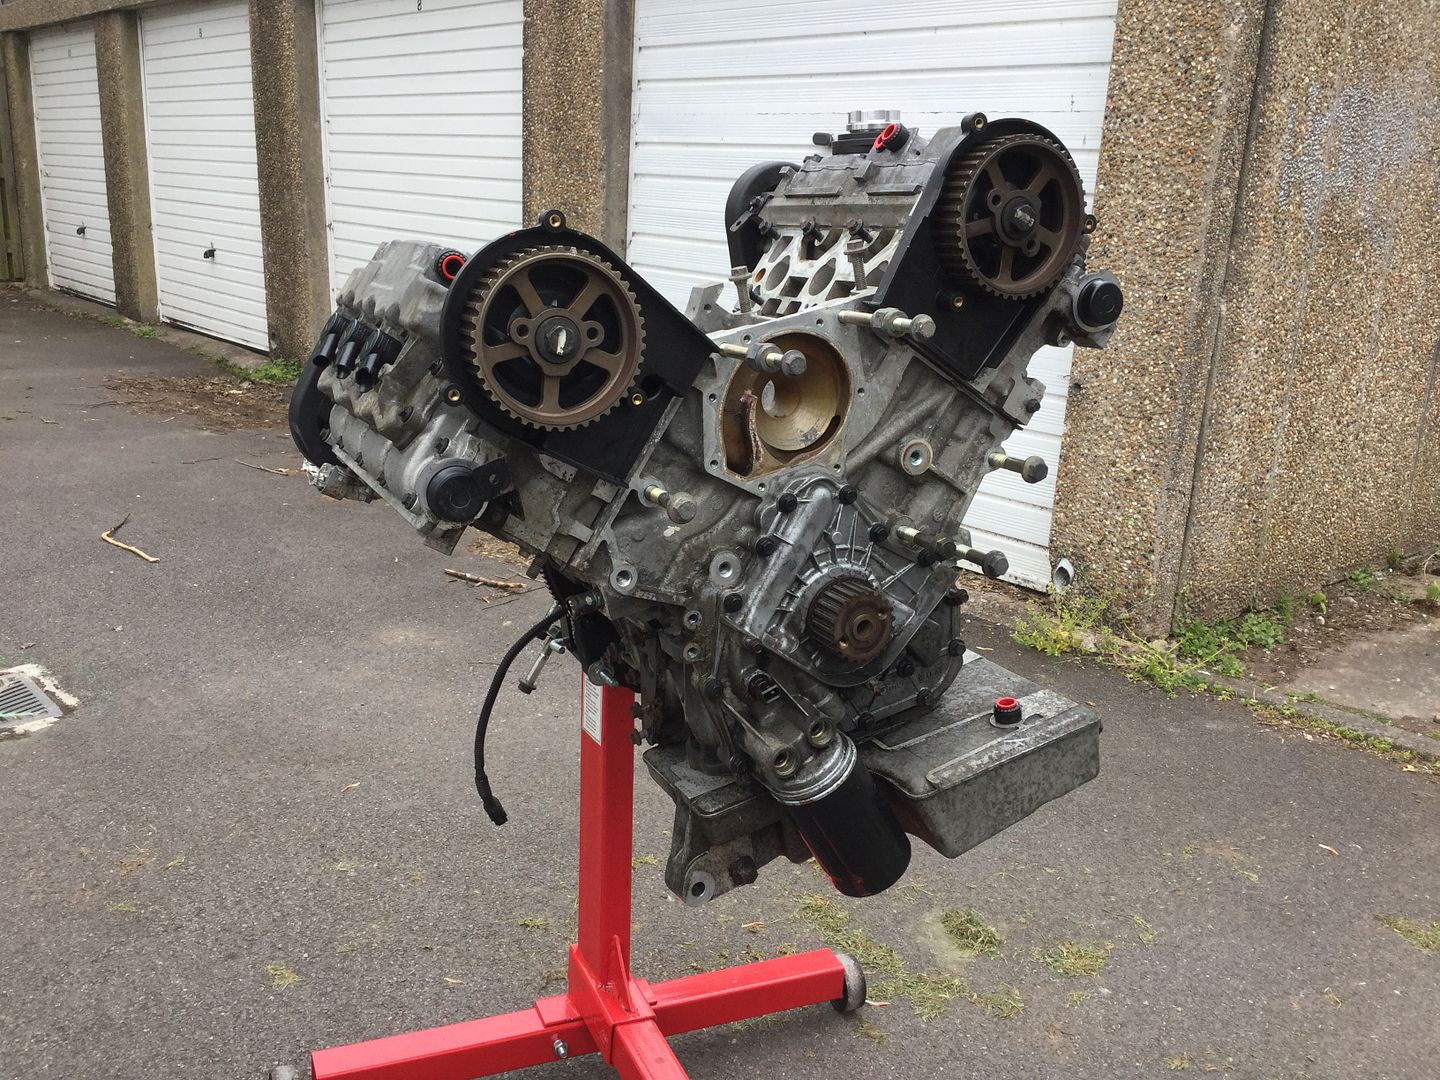
Gave the whole thing a good degreasing and then set the engine to the 'Safe' position and locked off the fly wheel. With that done I removed the thermostat, the old belt, pulleys and the water pump -


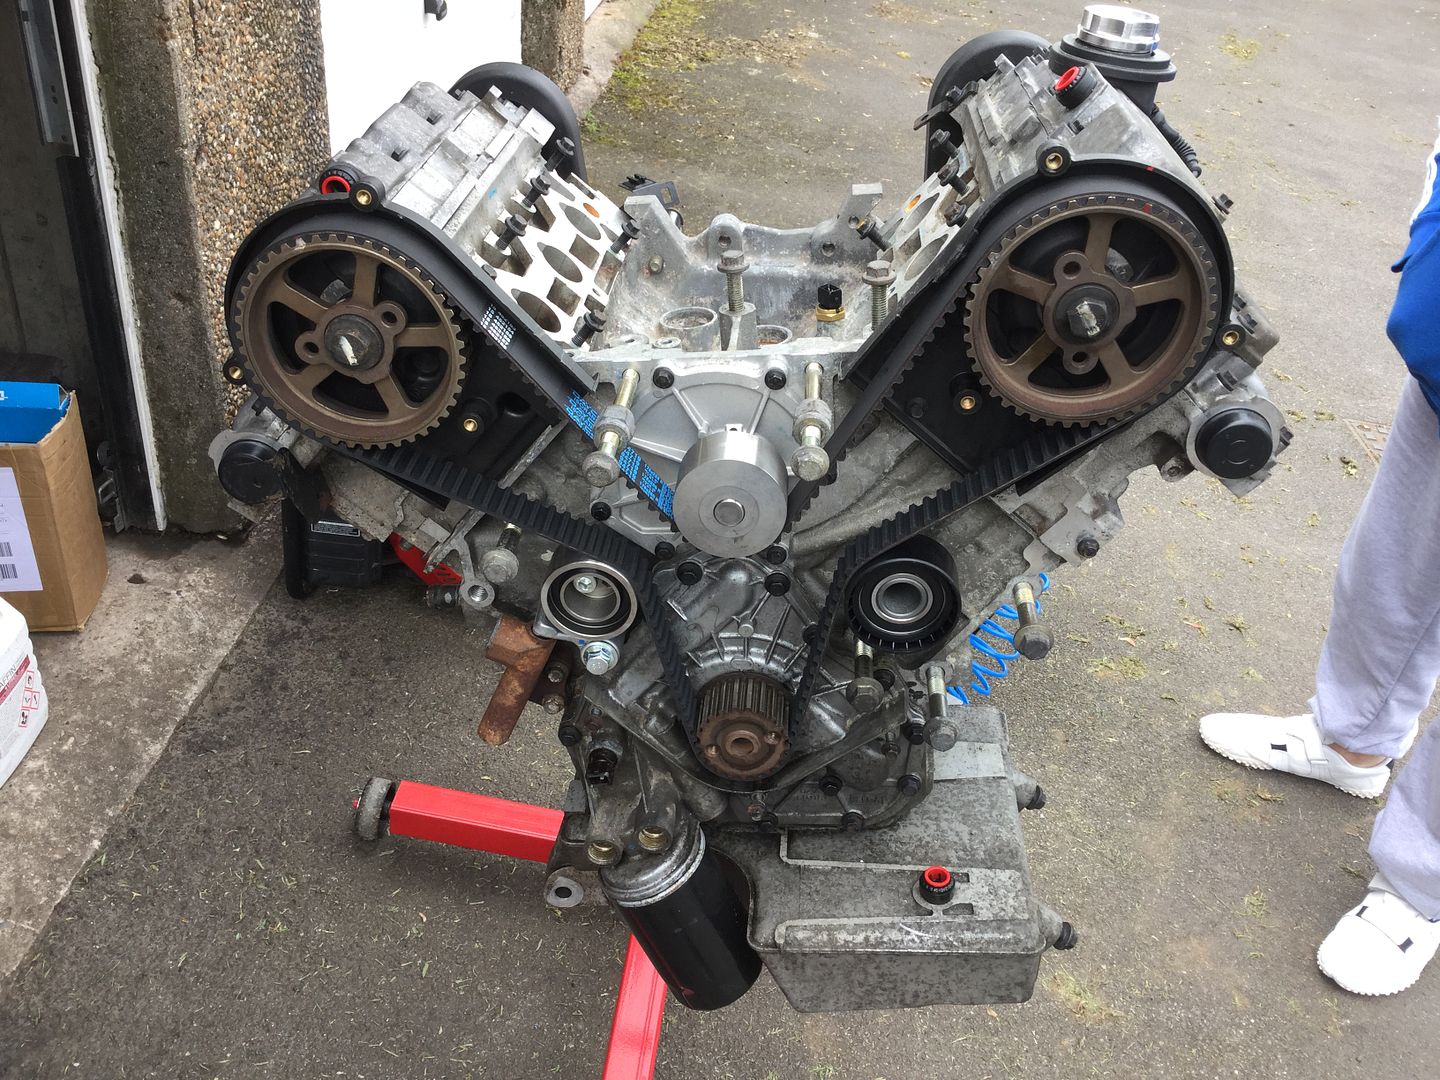
I've been over how I done the front belt on the XPG ZS without the service tools in a previous thread so I won't go over it again in this thread. Here's the engine with the new belt, pulleys and water pump fitted -


Then it was onto the rears. These are easy peasy to change !

With the engine still in the 'Safe' position, I marked the exhaust cam pulley, the old belt and the plastic housing case with grey paint so all the individual markings lined up. I also did the same for the inlet cam pulley. This gives me a datum point for when I fit the new belt -
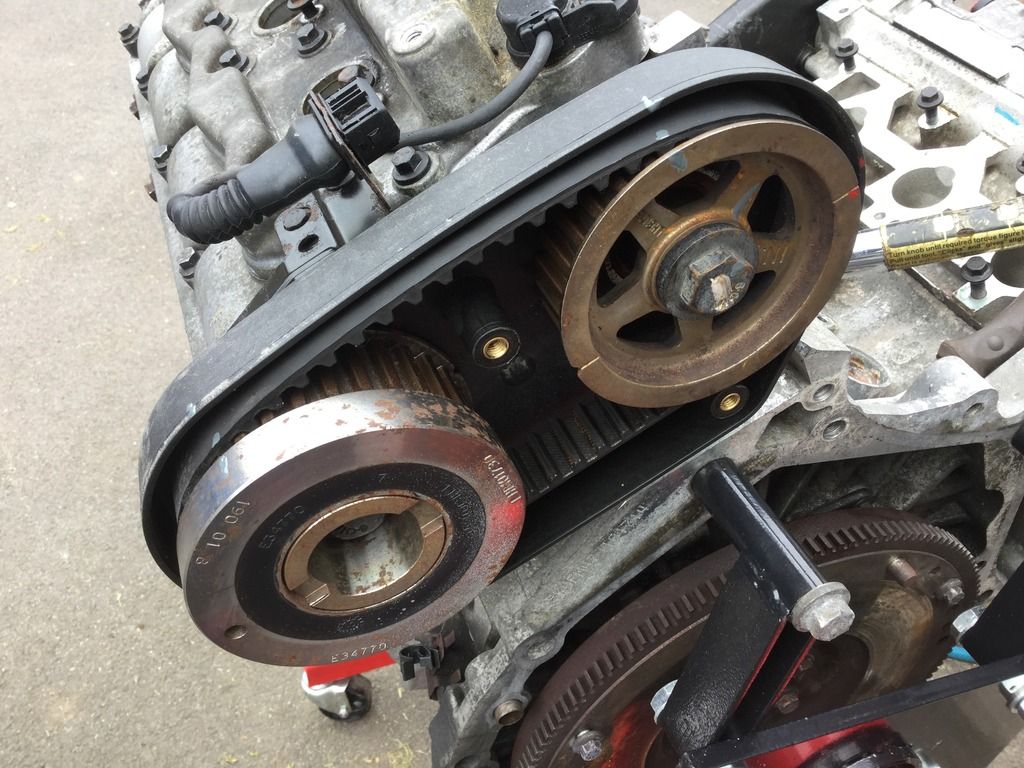


In the above photo you can also see I marked the inlet pulley and the centre pulley bolt with grey paint. I'll explain why later on in the post.

With those marked up I then removed the inlet cam pulley along with the old belt, (this is the opposite side as I forgot to take a picture) -
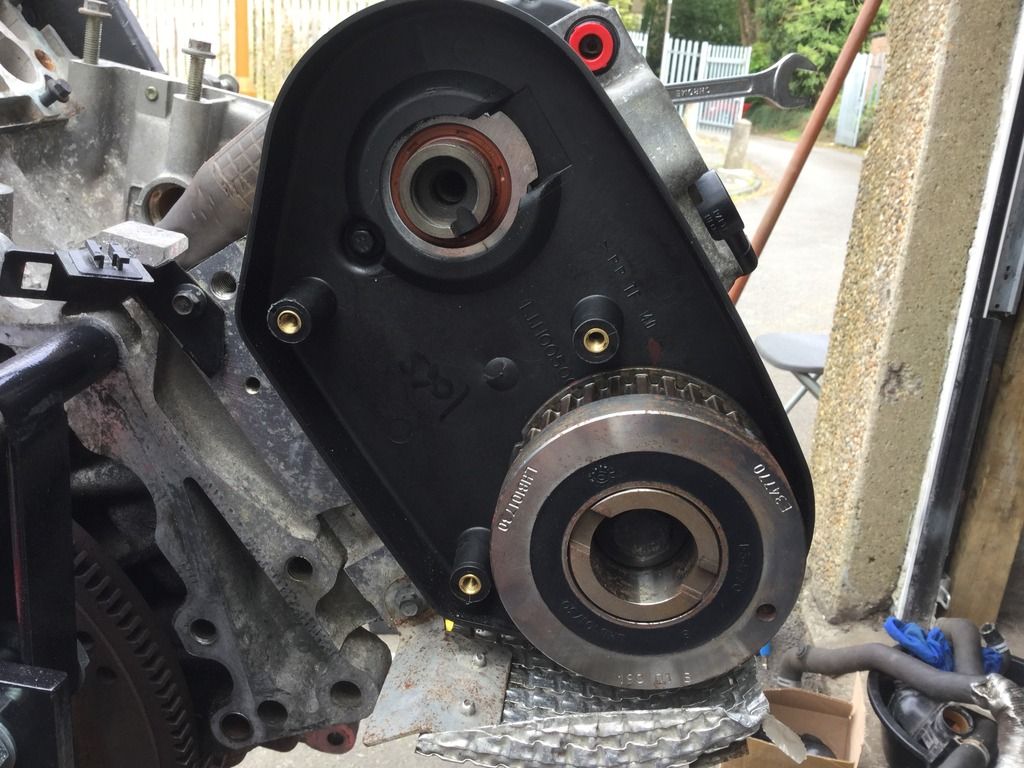


The exhaust cam pulley doesn't need to be removed.

Upon removing the inlet cam pulley and the old belt the exhaust cam pulley sprung forward around 3 teeth. This is where the markings on the pulley and the casing become invaluable as it will allow me to line everything back up later on.

There's no need to worry about the inlet cam moving though as the locked flywheel and the front belt won't allow it to.

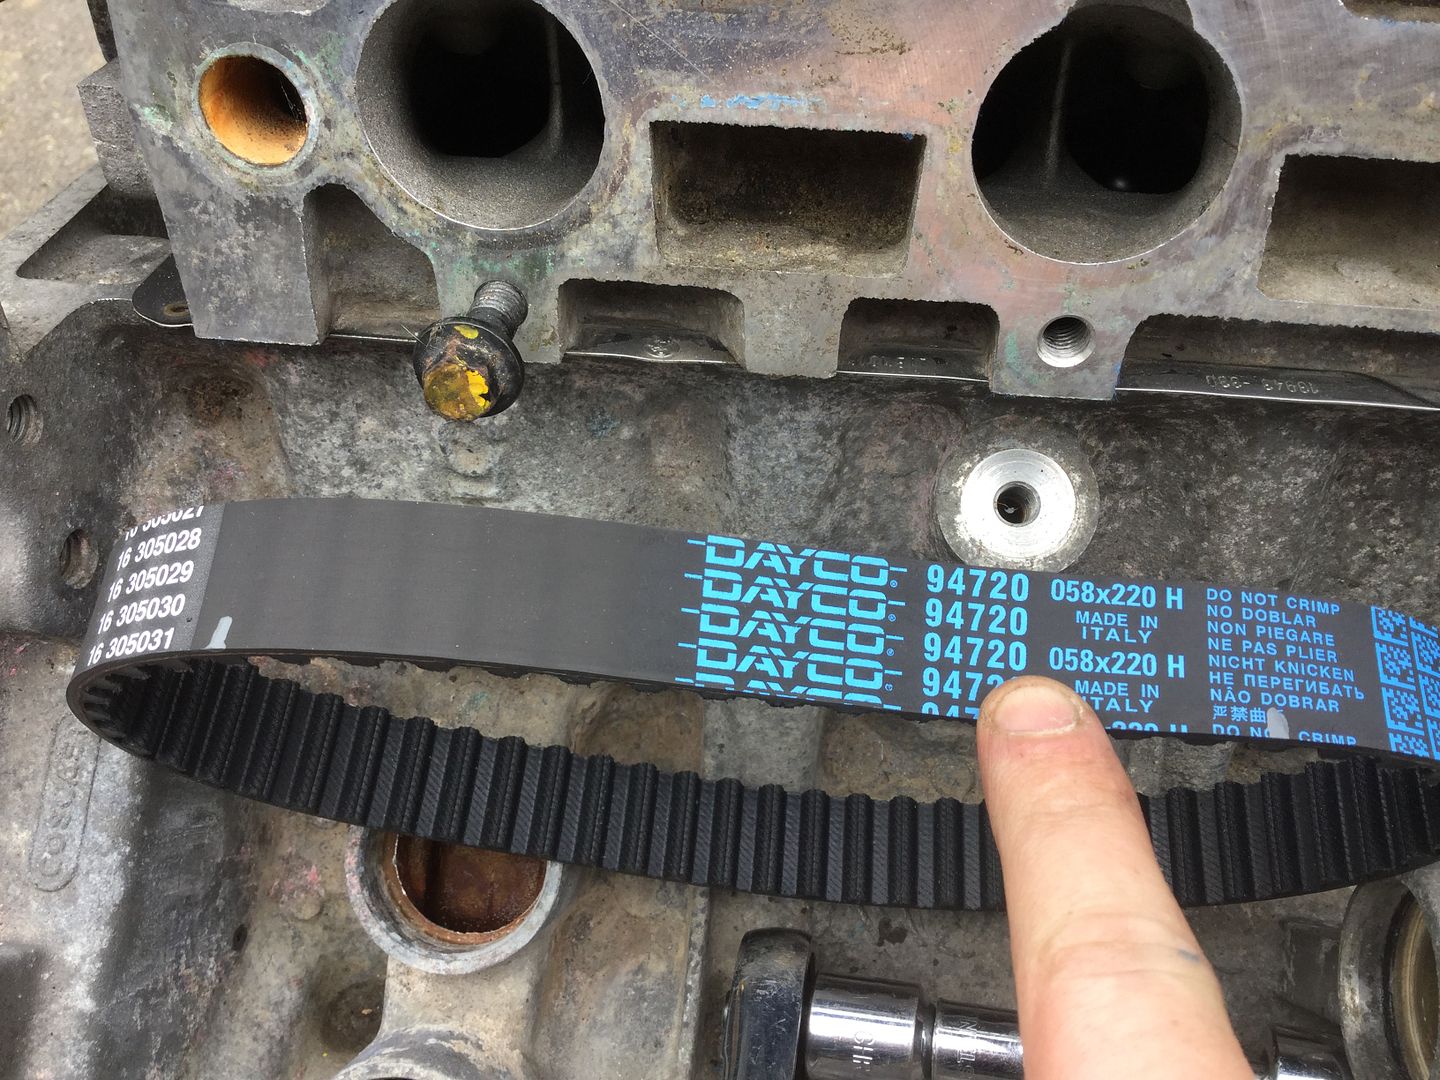
With those off I marked up the new belt with grey paint to match the old one. There's no real reason for marking the belt but it just allows me to be certain all the markings line up when fitted back onto the engine -


Then it was onto the re-fitting, this is where you need a friend or in my case, my dad showed up ! Firstly I fitted the new belt over the exhaust cam pulley and lined up the marking on the pulley with the marking on the belt. Then I had my dad turn the exhaust cam pulley back 3 teeth using a socket on a long bar and ratchet until the markings on the pulley and the belt lined up with the markings on the casing.

With those being held in position it was just a case of lining up the marks on the inlet cam pulley and the belt and then sliding that assembly up into its position until the inlet cam pulley popped into its woodruff key on the inlet cam -
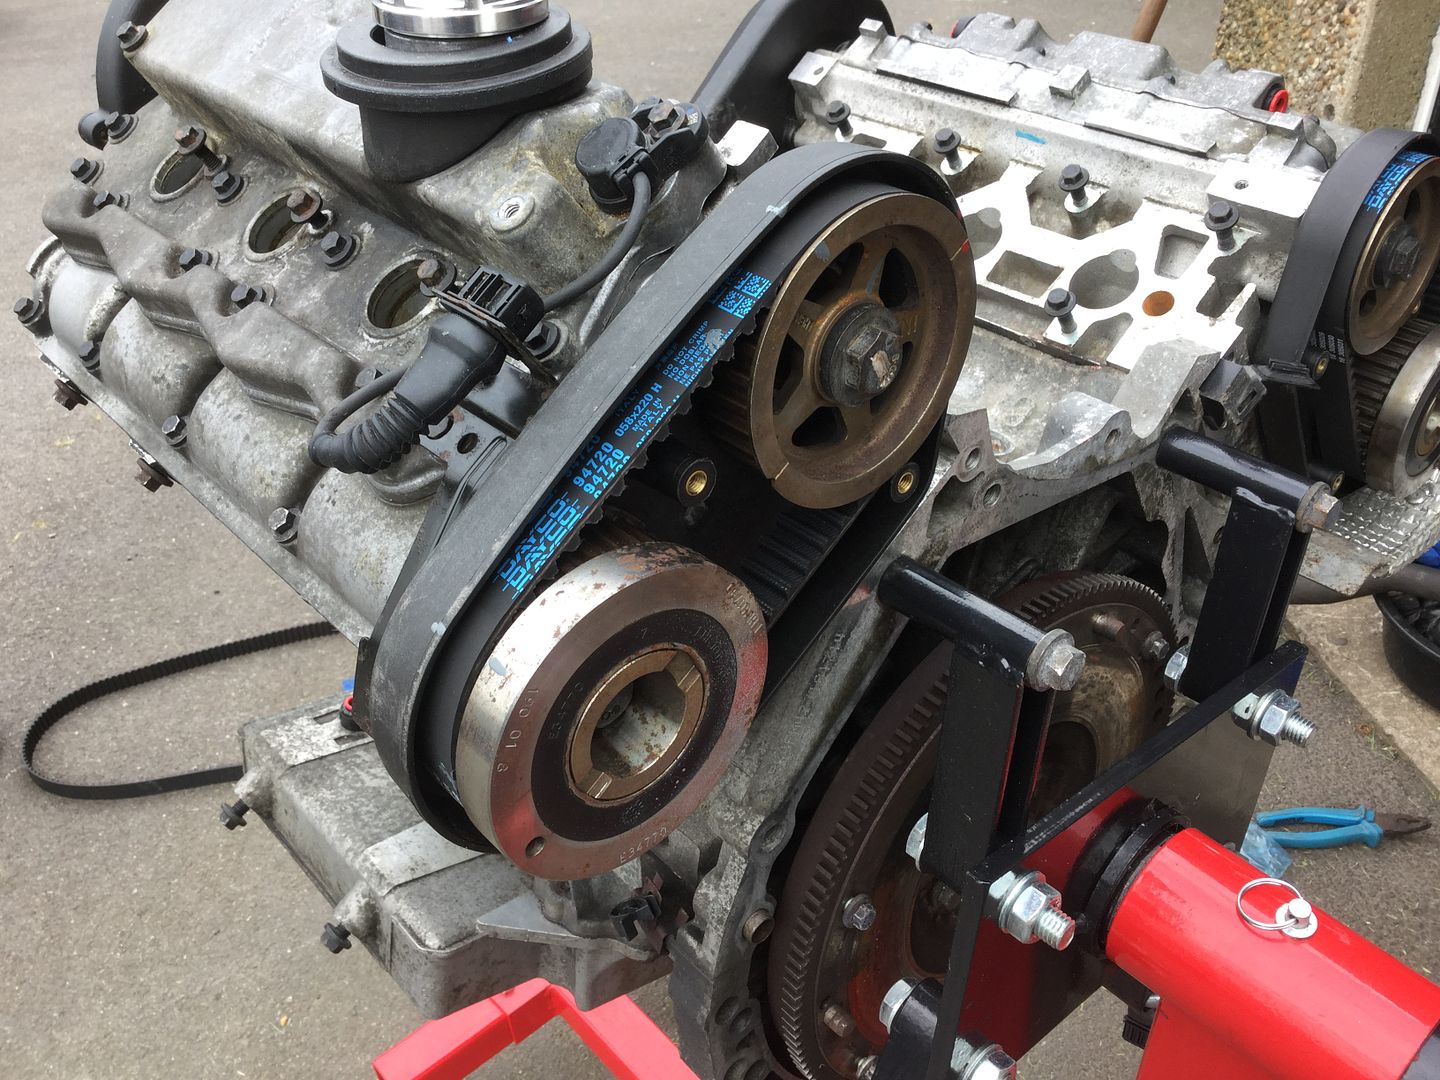


Further up in the thread I mentioned i marked the camshaft pulley bolt and the inlet cam pulley. The reason why is when you refit the pulley bolt it requires you to torque it up to 27nm and then a further 90 degrees. Having made the marks earlier all you have to do is torque it up and then tighten it until the markings line up.

Here's the other side done too -
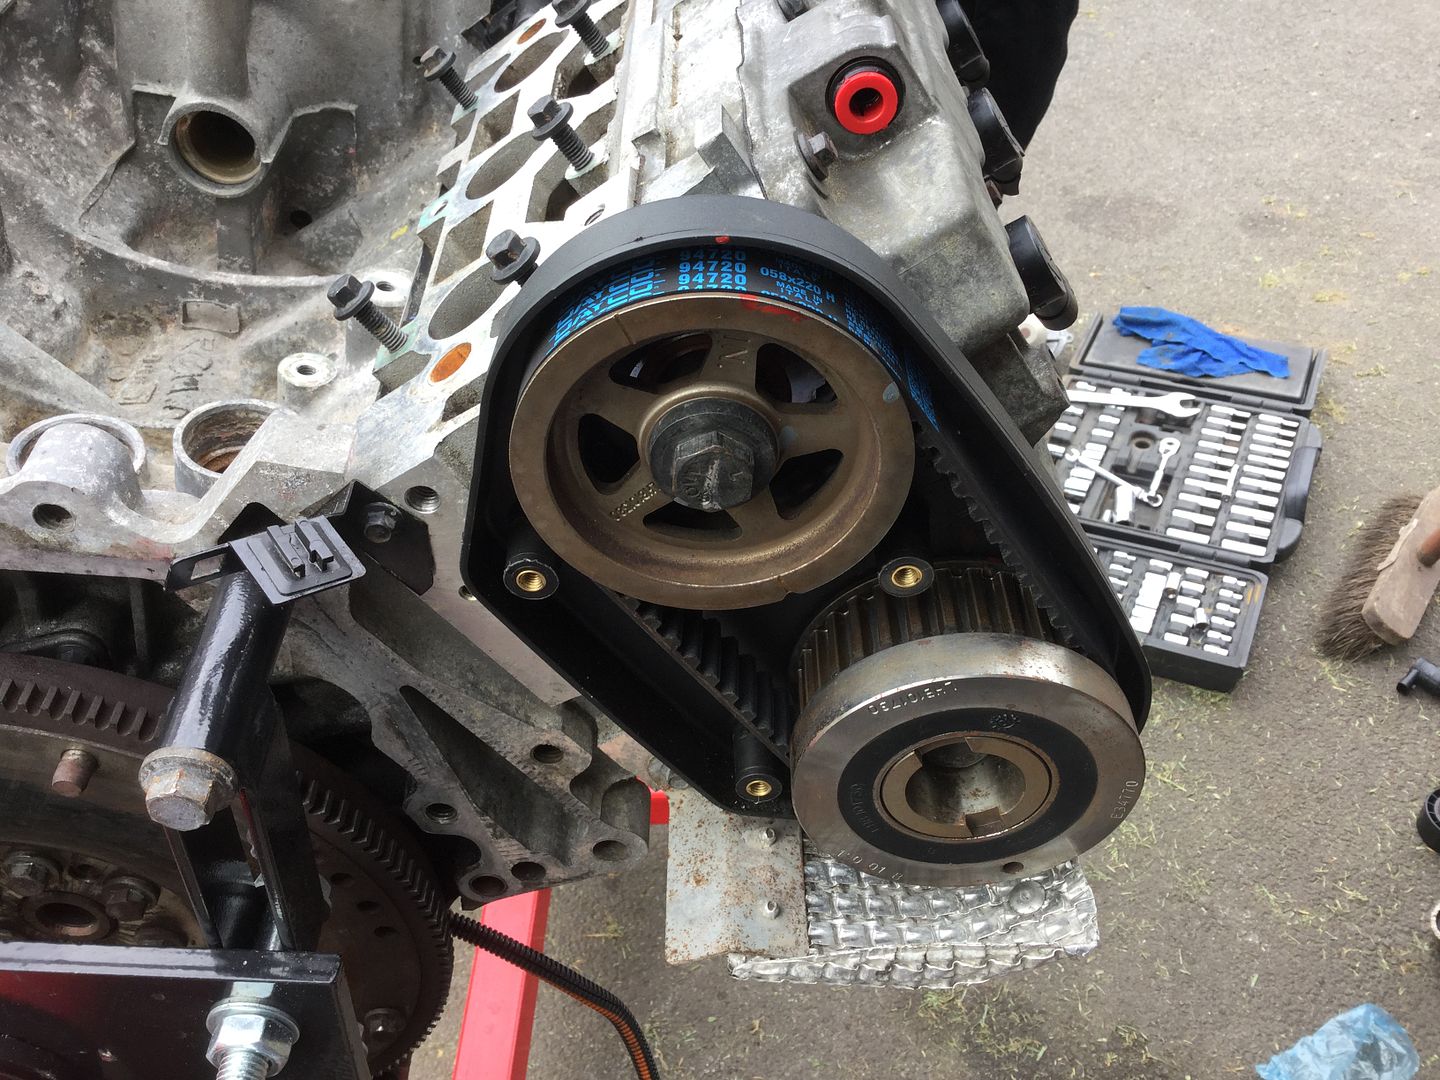


Hopefully that all makes sense. It's a lot easier than I may have made it sound and literally only takes around 10-15 minutes to change both belts.

Happy with the belts I than fitted the new thermostat and coolant plug -
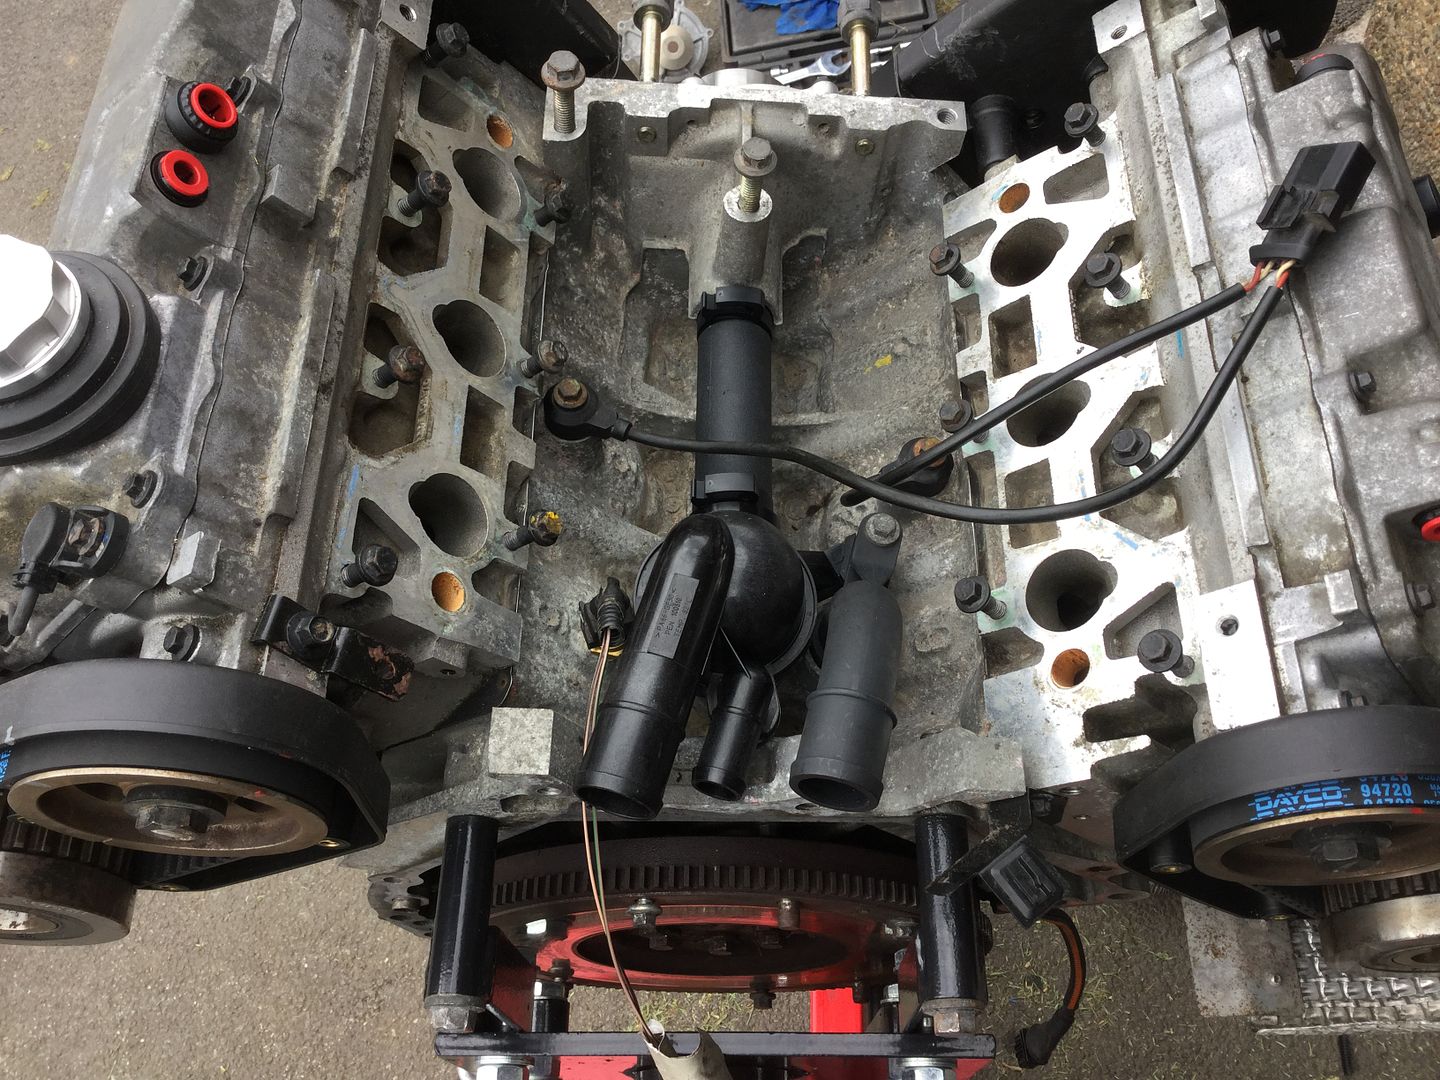


I also refitted the intake assemble with new gaskets and O-Rings and my refurbished VIS motors. I degreased all of the ancillaries and bolted those back on too with a new auxiliary belt.

Nothing too fancy and I didn't paint anything up either as that's the beauty with these modern engines, nothing's really seen when the engines back in and what is seen is usually covered with a plastic cover anyway !

Heres the engine pretty much ready to go back in, just need a new clutch, new coil packs, a set of new plugs and some manifold gaskets which will be ordered this evening ready for next weekend -
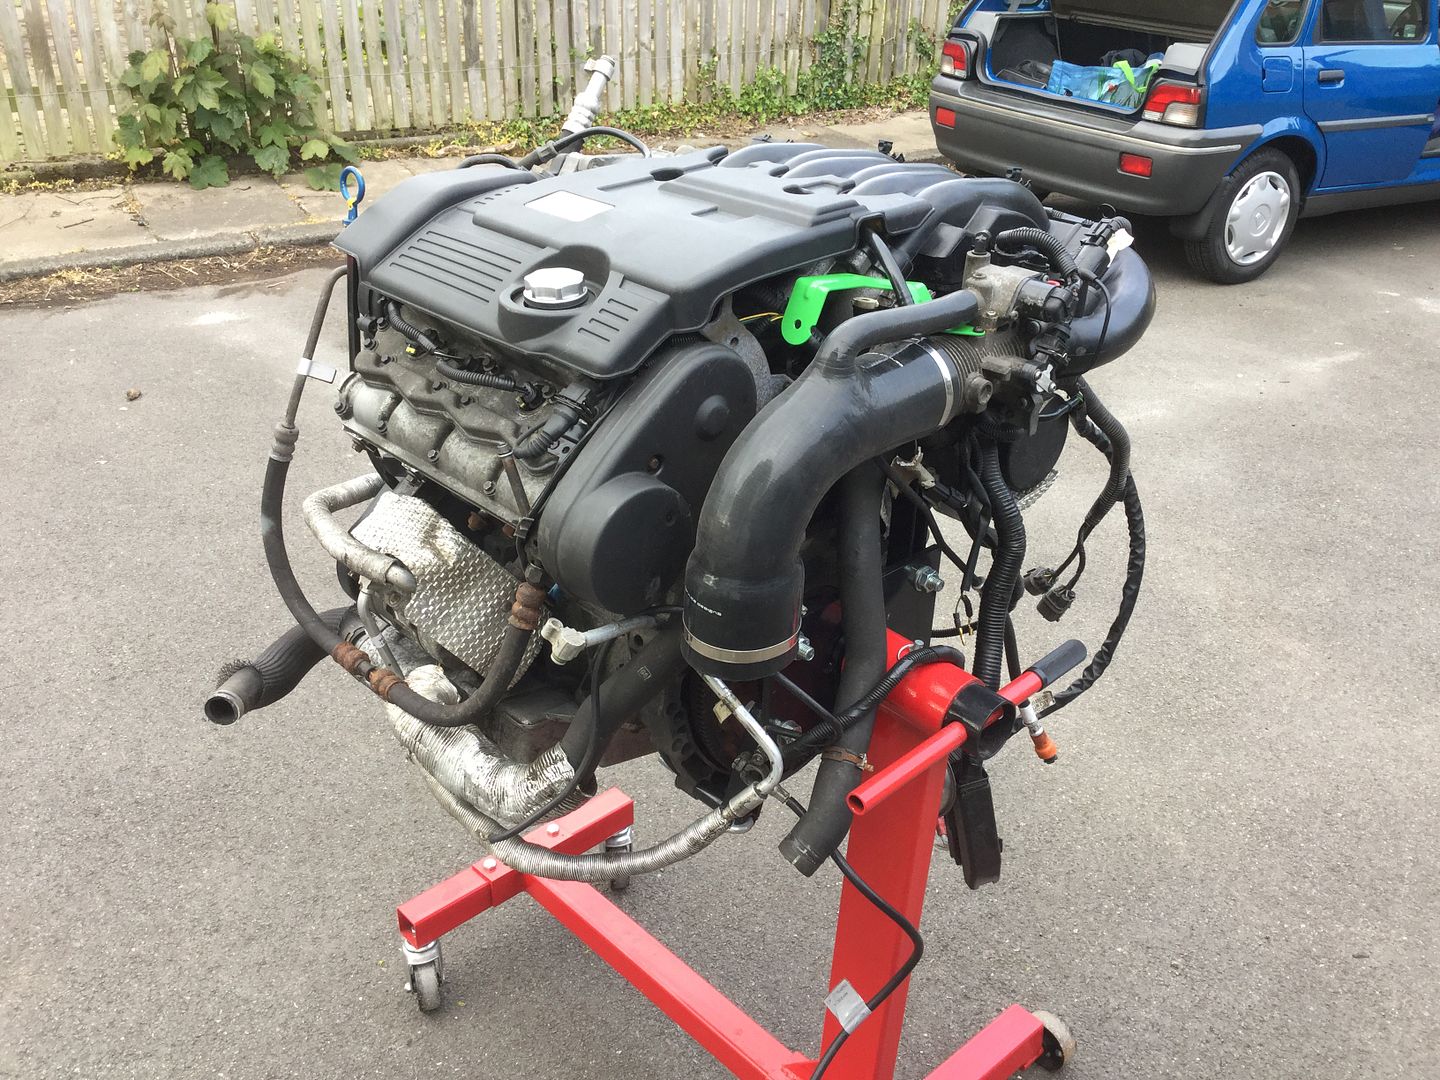
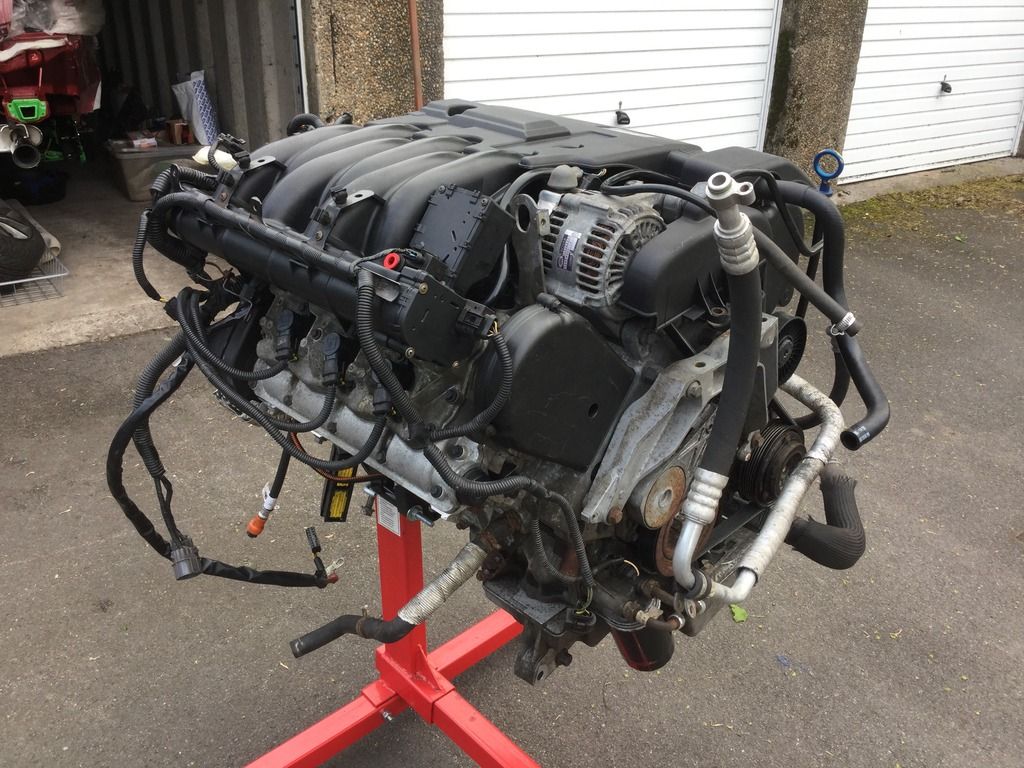


That's all the progress on the engine up to this point. Now it's onto the body and running gear.

CONTINUED IN A SECOND POST....

Last edited by Big-Jay; 14-05-17 at 04:32 PM.
Big-Jay is offline   Reply With Quote
Old 14-05-17, 04:25 PM   #118
Big-Jay
Member
 
Big-Jay's Avatar
 
Join Date: Jan 2016
Posts: 121
Big-Jay has a spectacular aura aboutBig-Jay has a spectacular aura about
CONTINUED FROM THE ABOVE POST...

Here's all the bits I've bought including new bushes, dampers and replacement stainless steel bolts etc -


Gave the dampers a quick keying over and a couple of coats of satin black as the E-Coat they come in isn't the best -


And got those built up with the springs -


Pushed the new bushes into the arms using my 6 tonne press -


And got those built up along with the swing arms -


Then I began bolting those back onto the car, starting with the dampers and arms -


The O-Ring on the damper is easily overlooked when fitting, wasn't any on mine when I removed them originally. It serves to stop the muck and water getting into your boot.


Next up was the swing arm and the ARB. I don't have the bushes for the ARB yet so it's just resting in place for the moment -


Decided to mock up the larger Janspeed backbox from my Duplex system to get an idea of how it will look -


Amazing !

Finally, I've now built up my rear calipers too -


I've got some rear wheel bearings on the way from DMGRS so if everything goes to plan I should have her rolling by next weekend.

Jay.

Last edited by Big-Jay; 14-05-17 at 07:16 PM.
Big-Jay is offline   Reply With Quote
Old 14-05-17, 07:22 PM   #119
Lukeus101
Member
 
Lukeus101's Avatar
 
Join Date: Feb 2012
Location: Huddersfield, West Yorks.
Posts: 2,944
Lukeus101 is a name known to allLukeus101 is a name known to allLukeus101 is a name known to allLukeus101 is a name known to allLukeus101 is a name known to allLukeus101 is a name known to allLukeus101 is a name known to all
This is going to be a serious show stopper
__________________

ZS Appreciation Facebook Group:
https://www.facebook.com/groups/475756782447499/

> ZR 105 (Broken) > MK2 ZS 180 (Sold) > MK1 ZS 180 (Sold) > ZR Replica (Dead) > MK1 ZS 180 (Broken)
Lukeus101 is offline   Reply With Quote
Old 14-05-17, 07:27 PM   #120
Big-Jay
Member
 
Big-Jay's Avatar
 
Join Date: Jan 2016
Posts: 121
Big-Jay has a spectacular aura aboutBig-Jay has a spectacular aura about
Quote:
Originally Posted by Lukeus101 View Post
This is going to be a serious show stopper
Thanks Lukeus !
Big-Jay is offline   Reply With Quote
Reply


Posting Rules
You may not post new threads
You may not post replies
You may not post attachments
You may not edit your posts

BB code is On
Smilies are On
[IMG] code is On
HTML code is Off

Forum Jump


All times are GMT. The time now is 08:05 PM.


Powered by vBulletin® Version 3.8.11
Copyright ©2000 - 2024, vBulletin Solutions Inc.
Copyright ? 2010 theMGZS.co.uk